Setting Up NAS with Auto Backups on the Raspberry Pi
Edit – Logmein killed Pirvoxy, so this part of the article no longer works.
Alright here’s the follow up to my last post, Share WiFi to Wired Connection with Ubuntu.
So I set up the rPi with rdesktop, gedit, ntfs-3g, Samba, Hamachi, Privoxy and rsync to build my NAS and VPN. I have two external hard drives (2 TB and 500 GP) plugged in to a powered USB hub. I also have the powered USB hub powering the rPi. I’ll reference the links I used as I go along, this wasn’t hard to do.
I’ll say it right now, if I can figure it out, anyone can.
First off if you haven’t put Rasbian on your rPi, go do it and then come back….you’re back already? Great, let’s get started.
I don’t like having to plug in a monitor, keyboard and mouse every time I want to access my rPi, so go ahead and do it the first time for the setup. Now that you have your peripherals all set up, let’s install rdesktop so we don’t have to do this again.
Open the terminal and then:
sudo apt-get install rdesktop
then get the IP address and write it down:
ifconfig eth0
Great. Now you can keep working on it as you have it set up or you can access it from another computer. IF you’re on linux, go to your terminal and enter:
rdesktop ipaddress from above -g 90% (the -g 90% tells rdesktop to launch at 90% of the size of your screen. If you want something larger or smaller, suit yourself.) Sign in as your user id and password for your rPi.
Since I’m not a big nano fan, I like to use gedit, let’s install it now:
sudo apt-get install gedit
Now I initially followed this guide to set up Samba, http://elinux.org/R-Pi_NAS. We’ll walk through the relevant parts. Let’s install Samba:
sudo apt-get install samba samba-common-bin
If you’re prompted to continue then say yes. Copy the the samba config file, in case we mess it up.
sudo cp /etc/samba/smb.conf /etc/samba/smb.conf.old
On the link above we’re told to use nano to update our config file, as I said, I don’t like it. The great thing about Linux is, if you don’t like something, you don’t have to use it. So we won’t use it…much.
Let’s work on that config file:
sudo gedit /etc/samba/smb.conf
Search for security (ctrl + F and type security, then press enter) and you’ll find the following:
# security = user
Go ahead and remove the #, so we just have:
security = user
Now let’s search for homes and change:
read only = yes
to
read only = no
Now save and close the file. Run the following command to restart Samba:
sudo /etc/init.d/samba restart
You’ll see the following:
Stopping Samba daemons: nmdb smdb
Starting Samba daemons: nmdb smdb
Samba comes configured with your user id defined, assuming it’s pi we will now allow pi to be a Samba user.
sudo smbpasswd -a pi
You’ll need to enter the password twice and then pi will be setup as the samba user id. If you would like to add an additional user(not required), then do the following:
sudo useradd marty -m -G users
sudo smbpasswd marty
You’ll be asked to enter the password for marty twice now.
Now let’s make a shared folder to house our main storage (this will be for user pi, not for marty):
sudo mkdir /home/pi/shared
We also need to make a folder to house our backups:
sudo mkdir /home/pi/backup
Once more we need to edit the Samba configuration file, this time we are telling it about the shared folder we just created. So let’s go do that:
sudo gedit /etc/samba/smb.conf
Scroll down to the end of the file and add the following:
[public]
comment = Public Storage
path = /home/pi/shared
valid users = @users
force group = users
create mask = 0660
directory mask = 0771
read only = no
Now save and close the file. Run the following command to restart Samba:
sudo /etc/init.d/samba restart
You’ll see the following:
Stopping Samba daemons: nmdb smdb
Starting Samba daemons: nmdb smdb
Now we are getting ready to start mapping our drives, so let’s make sure we have support for NTFS-formatted disks.
sudo apt-get install ntfs-3g
Great, good job!
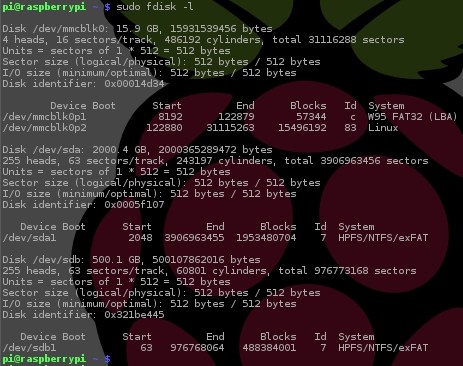
Let’s go find our hard drives that we have mounted so we can get them setup to do their jobs. Run the following command to determine where they are currently located in our file system:
sudo fdisk – l
You’ll see something like this:
Now let’s look at the results:
/dev/mcblk0 – This is the SD Card that Rasbian is running on.
/dev/sda – This is the 2 TB hard drive that I am using for my main storage.
/dev/sdb – This is the 500 GB hard drive that I am going to use for backing up my family pictures and business documents.
Let’s prepare to mount the harddrives by their UUID so they can be unplugged and plugged back in to the Raspberry Pi and will automatically mount to the correct file location. (Thank to Colin for this suggestion.)
In terminal execute:
sudo blkid
You will see results similar to the below:
/dev/sda1: UUID=”4369e650-ce1b-4ea5-8e24-809e275a0314″ TYPE=”ext4″
/dev/sda2: UUID=”1Ugipa-CKBF-qUpA-xJtp-q49N-fb6q-0Gikql” TYPE=”LVM2_member”
We will need to capture the values that are in quotes beside UUID=”xxxx”.
The next step is to mount the hard drives to the folders we created earlier. Before we do this we need to make sure that they are not currently mounted. We are going to do this the easy way, open the file explorer as root:
sudo pcmanfm
and you will probably see the two hard drives mounted, simply client the unmount button beside each one. then close the file manager. Now let’s mount the hard drives to their permanent location:
sudo mount /dev/sda1 /home/pi/shared
sudo mount /dev/sdb1 /home/pi/backup
Great job, now we have access from our home folder to both of these drives. But we need to make this happen automatically on boot, easy:
sudo gedit /etc/fstab
Now in the fstab file add the following two lines below the line that starts with /dev/mcblk0p2
Here is where we will use the UUID for each drive:
UUID=4369e650-ce1b-4ea5-8e24-809e275a0314 /home/pi/shared auto noatime 0 0
UUID=1Ugipa-CKBF-qUpA-xJtp-q49N-fb6q-0Gikql /home/pi/backup auto noatime 0 0
Make sure you tab where you see the spaces above. Now save and close the file. We are set now, the drives will auto-mount to our home folders when we reboot.
Now it’s time to get started with our backups, we need the software first:
sudo apt-get install rsync
(that was hard huh!)
Well we’ve reached the point where we have to use nano. It’s not that hard, but it’s definitely different than using a text editor. You will need to use your arrow keys to move up and down and then to save the file you’ll need to press ‘Ctrl + X’ and then you’ll be prompted to accept by pressing ‘y’. We are now going to configure our backups. I used the guide found onHow to Geek, as my inspiration for this, but I’ve modified a few things to work better for me. I want to give them credit for the idea though. If you read their article they instruct you to setup your backup to run nightly, however I thought that was bit much, so I decided to educate myself and figure out how to modify this. I found this link, which explains how crontab works. Basically crontab takes this entry to determine when it will execute the command that follows:
# Minute Hour Day of Month Month Day of Week Command
# (0-59) (0-23) (1-31) (1-12 or Jan-Dec) (0-6 or Sun-Sat)
0 2 12 * 0,6 rsync
I wanted to have my backups running at alternating times and only a couple of times a week, so let’s go ahead and configure that:
crontab -e
Now you are in nano, navigate down to the bottom of the list and enter the following:
0 2 * * 0,3 rsync -av –delete /home/pi/shares/Pictures /home/pi/backup
0 2 * * 1,5 rsync -av –delete /home/pi/shares/busdocs /home/pi/backup
Now save the file, ‘Ctrl + X’ and then confirm ‘y’. So let me explain what we just set up, I’ll go through the first line:
0 – 0 minutes
2 – 2 hours (2 AM)
* – Any day of the month.
* – Any month.
0,3 – Run this on Sunday and Wenesday. (0 – Sunday, 1 – Monday, 2 – Tuesday, etc)
rsync – Command to be ran.
-av – archive and verbose
– -delete – (MAKE sure there are TWO dashes – -, there should not be a space between these.) This parameter tells rsync to delete any file on the to folder that is not on the from folder, so if you remove a file in your main storage it will be removed in you backup.
/home/pi/shares/Pictures – This is the from folder.
/home/pi/backup – This is the to folder.
This last step is optional but recommended. Let’s go ahead and run rsync for two reasons, to verify that it can successfully back up your data and to get the biggest backup done.
rsync -av –delete /home/pi/shares/Pictures /home/pi/backup/Pictures
Depending on how much data you are backing up, this could take a while. When I first ran it I backed up around 40 GB of pictures and it took about 2 1/2 to 3 hours. So go get some coffee and relax.
So your backup is set and ready to run! You did it! And it wasn’t even that hard!
There may be a better way to set this up, but this what worked for me, I hope you’ve enjoyed getting your rPi setup as a NAS with auto backups!
One final piece, setup Hamachi so you can access your files remotely (yes you can already do it if you have SSH installed (which you should.)) Go to logmein.com and create a free account and set up your network. You can install this on Linux, Mac and windoze.
sudo apt-get update
sudo apt-get install –fix-missing lsb lsb-core (this will take a bit)
sudo dpkg -1 –force-architecture –force-depends logmein-hamachi_2.1.0.86-1_armel.deb
( the above line is dash dash force dash architecture and then dash dash force dash depends)
Now set up hamachi on the rPi:
sudo hamachi login
sudo hamachi attach [INSERT LOGMEIN.COM EMAIL HERE]
sudo hamachi set-nick [INSERT A NICKNAME FOR YOUR RASPBERRY PI]
Now back on your computer on logmein.com, go to your networks and grant the Pi permissions to join your network and write down the network ID (a 9-digit number) for that network.
Back on the rPi:
sudo hamachi do-join [THE NETWORK ID YOU WROTE DOWN]
Now start SSH so you can reach the rPi remotely:
sudo /etc/init.d/ssh start
You should test out the set up now by SSH’ing into the rPi at the virtual IP on the logmein.com site, it will be something like 25.xx.xx.xx:
ssh pi@25.xx.xx.xx
Now you can access your rPi remotely (outside of your network.)
You can also remote desktop into the pi at the new virtual IP address:
rdesktop 25.xx.xx.xx -g 70%
Here are the links that pulled knowledge from for all of this.:
http://www.howtogeek.com/139433/how-to-turn-a-raspberry-pi-into-a-low-power-network-storage-device/
http://linux.about.com/library/cmd/blcmdl1_rsync.htm